
Finding out when the bins need to go out using Python, Docker, and Pushover
When I lived in Australia, the local council would send us a little calendar a few times a year with all the bin collection dates listed on it. It had a magnet on the back, so you could stick it on the fridge. I think it also included some cheery information about how much the local MP was doing and why we should absolutely vote for them in the next election.
Now I live in Cambridge, and the local council here do not send us a little calendar, which is annoying. Instead they have an online tool where you plug in your postcode and it tells you when your collection times will be, which is neat, except I don't want to be standing in the kitchen every Tuesday Googling 'Cambridge bin collection times', only to find out that the collection was actually the previous day. I want to just know. So I decided to code myself a solution.
I was very inspired by Julia Evans's posts on tiny personal programs and how to use undocumented web APIs, and I felt like I had all the tools I needed to make this happen:
- An undocumented web API
- Python
- Docker, which is a utility which lets me run individual scripts as standalone containers, separate from the rest of my operating system. I'm not great at Docker, but there are lots of good tutorials for it. You don't need to use it - there's wasn't really any need to do so here except to avoid cluttering my Raspberry Pi with lots of little scripts. I won't remember how I started them and where to go to fix them if they break. Don't let this happen to you!
- A little server (a Raspberry Pi) to run a Docker container
- The delightfully simple app Pushover, which has a web API where I can send it a message and it sends that message to my phone as a push notification. Pushover costs $4.99, which was totally worth it to me, but you could adapt code of this sort to email you instead!
The GitHub repository for this app, which I called BinBoop (because it boops you when there's bins), is here.
Hacking an undocumented web API
The first thing I needed was data on when the bins would go out. I knew that the website had the data, and I had a hunch that it received that data after the page loaded, because the URL of the page stayed general but the data appeared after I plugged my postcode in. So I felt like it was a safe bet that I could see the service that the site itself was using, and use it myself. And I was right!
In Firefox developer tools, I opened up the 'Network' tab to spy on requests as I performed the postcode-inputting ritual. I filtered it to only show XHR requests, which are the asynchronous requests for data a page makes after it's finished loading itself. And lo and behold, I saw two GET requests. The first was to list all the street addresses for the postcode I entered, along with their location IDs in the API that the council were using. The second was to get the bin times for one location ID.

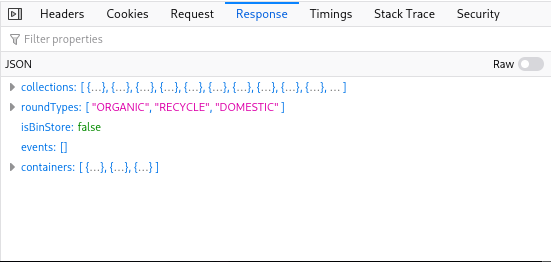
Looking in the 'Response' tab for that request, I could see that it had all the data I needed: an array of collection times, and some other information. I now knew the URL I needed to use to get this data, and very luckily for me, it didn't require any kind of authentication, like a cookie. All it needed was a location ID.
Writing a Python program
Time to break out Python! I find Python a good language for this sort of thing because it gets out of the way to let me do things quickly, and it has a great web API handling library. You could write a similar app in any other language!
It helps me define the behaviour of a program before I write it. Here's what I came up with:
- This program will check the bin collections API every evening
- If there's a bin collection scheduled tomorrow, it'll send me a phone notification
It's not the most involved program! But I already knew these things: I needed a way for my Python program to do something every evening, to check an API, and to send a phone notification.
I started by finding out how I could make Python do something on a schedule. The library I found is called... schedule! It describes itself as 'Python job scheduling for humans', which is good, because that's what I am.
I already had Python installed, so I just needed to add schedule:
pip3 install schedule
I made a new directory and started editing a file inside it:
mkdir binboop
cd binboop
vim binboop.py
Here's what my file looked like after I set up schedule. I also added some simple functions to print out nice logging messages.
# binboop.py

import time
import datetime
import schedule

alert_time = "21:00"

# Helper functions for logging
def get_current_time():
    return datetime.datetime.now().strftime("%Y-%m-%d %H:%M:%S")

def log(message):
    print(f"[{get_current_time()}] {message}")

def check_bin_collections():
    log("Checking bin collection times")

schedule.every().day.at(alert_time).do(check_bin_collections)

while True:
    schedule.run_pending()
    time.sleep(1)
This program uses Python f-strings, which are one of my favourite recent Python features.
Next, it was time to actually check my API. But to do that, I needed to store a secret - the location ID of my house. I wanted to upload this program to GitHub, and I didn't want secret codes and tokens to become public! So I borrowed a technique that's used a lot in Node.js programming - an .env file. This is a file that keeps environment variables, and doesn't get uploaded to GitHub.
# .env

LOCATION_ID=1234567890
To read this file, I needed a new library: python-dotenv.
pip3 install python-dotenv
Back in the Python file, I added the import and some more constants:
...
from dotenv import load_dotenv
...
location_id = os.getenv('LOCATION_ID')
number_of_collections = 1
bin_collections_url = f'https://api.example.com/{location_id}/?numberOfCollections={number_of_collections}'

round_types = {
    'ORGANIC': 'garden waste',
    'RECYCLE': 'recycling',
    'DOMESTIC': 'rubbish',
}
...
The round_types constant is a dictionary: a map of keys to values. Here, it will let me convert the API's descriptions of bin collection types, on the left, into something a bit friendlier, on the right.
Now I was ready to try and access the API. But wait! I needed two more libraries to do that - requests to handle web API requests and responses, and python-dateutil to handle dates a bit better than the standard Python date library! Back to pip:
pip3 install requests python-dateutil
Finally, I added the call to requests to my function:
...
import requests
from dateutil import parser
...
def check_bin_collections():
    log("Checking bin collection times")
    try:
        # Fetch the API data
        response = requests.get(url=bin_collections_url)
        data = response.json()

        # Parse the data from the next collection into friendly formats
        next_collection = data['collections'][0]
        log(next_collection)
        collection_date = parser.parse(next_collection['date']).date()
        collection_types = [round_types[x] for x in next_collection['roundTypes']]
        collection_types_string = ' and '.join(collection_types)
    except Exception as e:
        log(f"Error getting bin collection times: {e}")
...
I like wrapping my code in try/except blocks, because it means my program won't crash out if something goes wrong. In this case, lots of things can go wrong. The API URL might change, or the data format might change, or I might be disconnected from the internet. The except block will just output a log message in all those cases, and some information about the error so I can work out what went wrong later.
Here, I use requests.get to get the response of the API URL. I parse it as JSON, and then pull the date and collection type out of the first collection in the list (the one with the index 0).
To get the collection time, I used dateutil.parser.parse(), which will try and turn a string into a Python date object. In this case, the date was well formatted, so the parser had no trouble. I only needed the date section of the date, not the time, so I added .date() at the end.
To get the collection types, I use a neat Python feature called list comprehension, which is a great way to turn one list into another list. Here, for every value (x) in the roundTypes list inside next_collection, I return the matching pretty name from the round_types map I created earlier. So a list that looks like this:
['ORGANIC', 'DOMESTIC']
Will turn into this:
['garden waste', 'rubbish']
The next line turns that new list into this:
'garden waste and rubbish'
Much nicer!
Now that my program knew when the next collection would be and what would be in it, I needed to find out if I should be alerted or not. After the existing code, inside the try block, I added the following:
def check_bin_collections():
  ...
        # Check if the collection date is tomorrow (we want to be alerted
        # the night before)
        tomorrow = datetime.date.today() + datetime.timedelta(days=1)
        if collection_date == tomorrow:
            payload = {
                "message": f"Don't forget to put the {collection_types_string} {'bins' if len(collection_types) > 1 else 'bin'} out tonight.",
            }
            send_alert(payload)
  ...
First, I calculate what tomorrow is: it's datetime.date.today() plus a timedelta of days=1. Thanks, Python, that was very logical! And if the collection date is indeed tomorrow, it's time to send myself a notification. I build a new message using an f-string, and call a new function, send_alert().
To send a Pushover alert, I created a new application in Pushover and made a note of my API key and user key. These get added to the .env file:
# .env

...
PUSHOVER_TOKEN=1234567890
PUSHOVER_USER=0987654321
Back in the main Python file, here's the new function, and some more setup constants. I looked at the Pushover API documentation to find out what I needed to do here.
pushover_url = 'https://api.pushover.net/1/messages.json'
pushover_params = {
    "token": os.getenv('PUSHOVER_TOKEN'),
    "user": os.getenv('PUSHOVER_USER'),
}
...
# Send an alert via Pushover
def send_alert(payload):
    log("Sending alert")
    try:
        params = {**pushover_params, **payload}
        response = requests.post(pushover_url, params=params)
    except Exception as e:
        log(f"Error sending alert: {e}")
The params = line combines the default Pushover params, which authenticate my app, and the params sent as the payload to the function, which is currently just the message - but I could add lots of other things to those params if I wanted to! Finally, I use requests.post to send Pushover my message. And with that, my whole program is done!
I tested the program a bunch, to make sure that the scheduler, the API fetching and notification sending all worked as expected. A better way to do this would be to write unit tests for the program, which I might do later!
Creating a Docker container
If I wanted to, I could just use a Linux service to run this Python program whenever my server starts, but I was developing the program on my laptop, which has Python, while the Raspberry Pi does not, so running the program there would also require setting up Python. It was instead time to set up Docker (especially because I already have lots of things running using Docker on that Raspberry Pi).
The first thing I needed to do was find a way to tell Docker which Python libraries to install using pip. The easiest way I know to do this is to make a copy of all the packages I've currently got installed into a file called requirements.txt, and then remove the ones I didn't need for this program.
pip3 freeze > requirements.txt
This creates a line for each package pip has installed. I left only the ones I needed:
# requirements.txt

python-dateutil==2.8.2
python-dotenv==0.20.0
requests==2.27.1
schedule==1.1.0
Then, I created a Dockerfile - a file that tells Docker how to create an image. To do this, I mostly followed these excellent instructions, which luckily came up when I searched for 'Python Docker'.
# Dockerfile

FROM python:alpine
WORKDIR /app
COPY requirements.txt requirements.txt
RUN pip3 install -r requirements.txt
COPY . .
CMD [ "python3", "-u", "binboop.py"]
The first line tells Docker that I want to base my image on an existing image: the Docker Python image, specifically its Alpine Linux version, because Alpine Linux is a very lightweight and resource-efficient distro. I got that 'tag' from this page. Next, I switch to a new directory inside the image called /app. I copy the requirements.txt file I just created from my host machine into /app, and run pip3 install with the -r flag to install everything it finds in the requirements file. Then, I copy the rest of the host directory over, and finally I run my program with the command python3 -u binboop.py. The -u flag tells Python to send its output unbuffered, which I discovered I needed, otherwise my lovely logs wouldn't come up when I ran docker logs.
Now that my Dockerfile is done, I could test my brand new image. First I build it:
$ docker build --tag binboop .
Sending build context to Docker daemon  66.05kB
Step 1/6 : FROM python:alpine
alpine: Pulling from library/python
df9b9388f04a: Pull complete
a1ef3e6b7a02: Pull complete
7a687728470e: Pull complete
4ecf30de1710: Pull complete
a1f99e431609: Pull complete
Digest: sha256:21c71a37aaa8b4bec1d07f373c7f32322d935accfeeb0b0860be1df6b194ecb5
Status: Downloaded newer image for python:alpine
 ---> 2c167788a673
Step 2/6 : WORKDIR /app
 ---> Running in 1d49995bd5a2
Removing intermediate container 1d49995bd5a2
 ---> 072a20c39822
Step 3/6 : COPY requirements.txt requirements.txt
 ---> 27b9839e5a13
Step 4/6 : RUN pip3 install -r requirements.txt
 ---> Running in ad82f1e9fcf1
[...]
Removing intermediate container ad82f1e9fcf1
 ---> 5980a8c5c83a
Step 5/6 : COPY . .
 ---> d14c4aa07381
Step 6/6 : CMD [ "python3", "-u", "binboop.py"]
 ---> Running in 2e1fc3abe01f
Removing intermediate container 2e1fc3abe01f
 ---> c5caa674313a
Successfully built c5caa674313a
Successfully tagged binboop:latest
Then I check that it's been successfully created:
$ docker images
REPOSITORY   TAG       IMAGE ID       CREATED              SIZE
binboop      latest    c5caa674313a   About a minute ago   59.1MB
Then I run it as a container:
$ docker run binboop
[2022-05-04 21:42:14] BinBoop is running!
[2022-05-04 21:42:14] Sending alert
This command then hangs, because BinBoop runs an endless while True loop, but we have verified that it's working perfectly, so we can stop it and carry on with the final step of this process!
Creating a Docker Compose file
To traditionally run a Docker image as a container, you'd need to write a terminal command, passing in various necessary bits of information. One of those is the environment variables that BinBoop needs to connect to its APIs. Notice how BinBoop ran above, but the environment variables weren't set, so when it came time to check the collection times, BinBoop would fail! In the future, I'll add some code to check that these environment variables are set at startup, which would be a better way to handle this issue.
I don't want to pass environment variables in a command line, so I'm going to use Docker Compose - an extra Docker utility which lets me write out my containers as a YAML file, and then run them with a single simple command. Another benefit of this is that I can define a whole bunch of Docker services in one go, and run them all together, which is precisely what I do on my Raspberry Pi.Let's create docker-compose.yml. I created it in the directory above the binboop directory.
# docker-compose.yml

version: "3.3"

services:
  binboop:
    build:
      context: ./binboop
      dockerfile: Dockerfile
    container_name: binboop
    restart: unless-stopped
    environment:
      - LOCATION_ID=1234567890
      - PUSHOVER_TOKEN=1234567890
      - PUSHOVER_USER=0987654321
The binboop service description is a bit like the Dockerfile description. There's a context, which tells Compose to go into the directory binboop inside the one the file is in, and a dockerfile declaration, which gives it the name of the Dockerfile. Most importantly, the environment array tells Compose the names and values of the environment variables that BinBoop needs to run.
With this file in place, in the same directory, I run docker-compose:
$ docker-compose up -d
The -d flag tells Docker to 'daemonise' my services, or run them in the background and restart them when the system restarts. With this command, Compose will do essentially all the same things as the previous individual docker commands, but it will also pass my environment variables across so that BinBoop works.
Once I had my container running, I could make sure that BinBoop was working correctly by checking its logs:
$ docker logs binboop
[2022-05-04 19:52:41] BinBoop is running!
[2022-05-04 19:52:41] Sending alert
[2022-05-04 21:00:00] Checking bin collection times
[2022-05-04 21:00:02] {'date': '2022-05-04T00:00:00Z', 'roundTypes': ['ORGANIC', 'RECYCLE'], 'slippedCollection': True}
And now I know it's working!
This was a fun way to spend an evening, messing around with APIs, Python, and Docker. I learned more about Docker, which is useful, and I enjoyed breaking down my working in this blog post. For instance, it showed me that I hadn't set up any error handling for situations where the environment variables hadn't been defined!